So today I’m setting out to recreate my home lab.
Here is a quick view of the resources I’m restructuring.
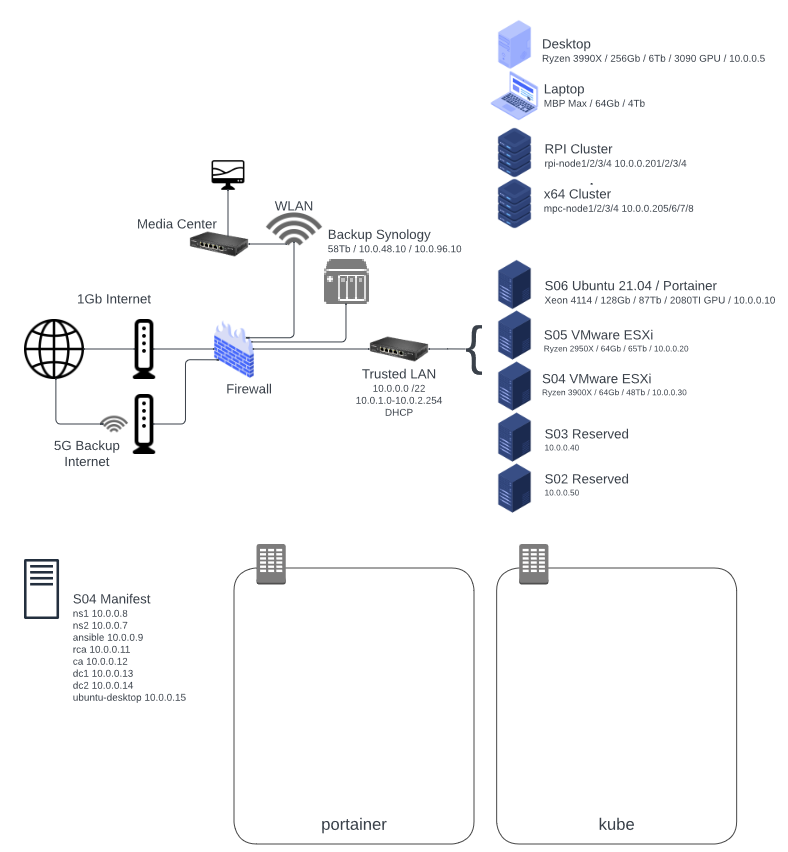
While eventually, I want to reconstruct into a Kubernetes Rancher configuration with S05, RPI Cluster and x64 Cluster, today I’m going to focus on S04 which will have my traditional and more stable network services.
What’s the Plan?
First up is DNS Virtual Machines done via PiHole on Ubuntu 22.04 LTS.
The second will be an Ansible host also on Ubuntu 22.04 LTS.
PIHole Server Installation
If you’re not familiar with PIHole, it is a DNS server with blacklisting or blackholes for adware and malicious domains. It’s a great project for beginners as it brings some immediate benefits for your home network by blocking ads from your web browsing experience.
My goal is just that. I also want to block others from tracking me through logging my domain name queries, so I’ll be making my servers recursive so that they resolve addresses directly, rather than rely on my ISP or someone like Google.
If you want to check out the PIHole project, you can find it on GitHub.
https://github.com/pi-hole/pi-hole
For the PiHole, my goal is to make these recursive. However, because I also want to run an Internal Windows Server infrastructure, I will need to support Dynamic DNS for Active Directory. It may be possible to host all of those SRV and related records in PiHole, but I just don’t have the energy to sort that out. So I will first make the PiHole server primary and then move to the internal DNS servers once I have an Active Directory infrastructure stood up. This means that NS1/2 won’t cover my nova.ttgb.us domain.
To make this easier, I set the DNS on my DHCP server to point to an external source while I was changing the internal name servers. This is primarily because I was rebuilding these name servers from an old configuration and needed to maintain internet connectivity while doing that.
After creating two new Ubuntu 22.04 LTS virtual servers in VMware ESXi on Server S04, I set up DHCP reservations for these servers on the Firewall as 10.0.0.8 and 10.0.0.7. This is more of an IPMI issue as I could have manually set the values in Ubuntu, but it helps me to visualize my IP plan on the DHCP server.
Since I did a minimal server install, the first thing I did was run into programs I needed to load.
So I started with
sudo apt update && sudo apt upgrade -y
sudo apt install net-tool
Because I’m old school and don’t always remember my Linux commands, I decided just to reboot.
I understand most of the modules were reloaded after the update, and in fact I was asked about if it was okay to do so, but I also wanted to renew the DHCP lease and didn’t want to type endless commands just to be the least impactful.
sudo reboot nowAfter the reboot, I verified the correct IP addresses.
ifconfigNext is to install PIHole using the installation script from their GitHub.
https://github.com/pi-hole/docs
https://github.com/pi-hole/pi-hole/blob/master/automated%20install/basic-install.sh
This script is aliased with a shorter URL shown here.
Also, I’m using Ubuntu 22.04 LTS which is unsupported as of May 15, 2022, by PIHole. So I followed this discord comment to revise the command to accommodate a bug in Whiptale.
https://discourse.pi-hole.net/t/os-release-debian-11/54779/9
Here is the working command.
sudo PIHOLE_SKIP_OS_CHECK=true bash -c "$(curl -sSL https://install.pi-hole.net)"So there are a few choices during installation. I didn’t change any of them.
My temporary password was ns1: xxxxxxxx
My temporary password was ns2: xxxxxxxx
To change the random password, I’m going to enter the following from the command line.
pihole -a -p passwordNow that the generic PIHole server is running, I want to make it recursive.
The instructions for doing this can be found on the PIHole documentation page here
https://docs.pi-hole.net/guides/dns/unbound/
But here are my initial notes.
sudo apt install unboundNext, I need to create a configuration file for unbound. Because I used a minimal install of Ubuntu, I’ll also install nano.
sudo apt install nanosudo nano /etc/unbound/unbound.conf.d/pi-hole.confHere was the default configuration file. You can look at the documentation above for unbound to see if this is the most current default configuration.
Note that we are binding to loopback with an alternate port of 5335.
This is because unbound is only serving PIHole directly, and not clients.
server:
    # If no logfile is specified, syslog is used
    # logfile: "/var/log/unbound/unbound.log"
    verbosity: 0

    interface: 127.0.0.1
    port: 5335
    do-ip4: yes
    do-udp: yes
    do-tcp: yes

    # May be set to yes if you have IPv6 connectivity
    do-ip6: no

    # You want to leave this to no unless you have *native* IPv6. With 6to4 and
    # Terredo tunnels your web browser should favor IPv4 for the same reasons
    prefer-ip6: no

    # Use this only when you downloaded the list of primary root servers!
    # If you use the default dns-root-data package, unbound will find it automatically
    #root-hints: "/var/lib/unbound/root.hints"

    # Trust glue only if it is within the server's authority
    harden-glue: yes

    # Require DNSSEC data for trust-anchored zones, if such data is absent, the zone becomes BOGUS
    harden-dnssec-stripped: yes

    # Don't use Capitalization randomization as it known to cause DNSSEC issues sometimes
    # see https://discourse.pi-hole.net/t/unbound-stubby-or-dnscrypt-proxy/9378 for further details
    use-caps-for-id: no

    # Reduce EDNS reassembly buffer size.
    # IP fragmentation is unreliable on the Internet today, and can cause
    # transmission failures when large DNS messages are sent via UDP. Even
    # when fragmentation does work, it may not be secure; it is theoretically
    # possible to spoof parts of a fragmented DNS message, without easy
    # detection at the receiving end. Recently, there was an excellent study
    # >>> Defragmenting DNS - Determining the optimal maximum UDP response size for DNS <<<
    # by Axel Koolhaas, and Tjeerd Slokker (https://indico.dns-oarc.net/event/36/contributions/776/)
    # in collaboration with NLnet Labs explored DNS using real world data from the
    # the RIPE Atlas probes and the researchers suggested different values for
    # IPv4 and IPv6 and in different scenarios. They advise that servers should
    # be configured to limit DNS messages sent over UDP to a size that will not
    # trigger fragmentation on typical network links. DNS servers can switch
    # from UDP to TCP when a DNS response is too big to fit in this limited
    # buffer size. This value has also been suggested in DNS Flag Day 2020.
    edns-buffer-size: 1232

    # Perform prefetching of close to expired message cache entries
    # This only applies to domains that have been frequently queried
    prefetch: yes

    # One thread should be sufficient, can be increased on beefy machines. In reality for most users running on small networks or on a single machine, it should be unnecessary to seek performance enhancement by increasing num-threads above 1.
    num-threads: 1

    # Ensure kernel buffer is large enough to not lose messages in traffic spikes
    so-rcvbuf: 1m

    # Ensure privacy of local IP ranges
    private-address: 192.168.0.0/16
    private-address: 169.254.0.0/16
    private-address: 172.16.0.0/12
    private-address: 10.0.0.0/8
    private-address: fd00::/8
    private-address: fe80::/10
With unbound now installed and configured, we need to change PIHole to point to it rather than whatever default we chose when we installed PIHole initially.
From the PIHole Web Interface which I have logged into as admin:
Settings > DNS > Upstream DNS Servers
1. Remove any existing selected DNS servers. In my case IPv4 for Google
2. Add Custom 1 (IPv4) value as “127.0.0.1#5335” and check the box.
I’m also changing the server to allow all connections. This is normally not a best practice, but my internal network has multiple subnets which means that PIHole will generate errors that requests are coming from other networks.
Settings > DNS > Interface settings > Permit all Origins (check)
Now because I have two PIHole servers, I wanted to make sure that a change in the primary was automatically replicated to the secondary. To test this concept, I first created two local DNS records on NS1. The goal will be to automatically replicate these to NS2.
To do this, I first established two local DNS “A” records.
From the PIHole Web Interface which I have logged into as admin:
Local DNS > DNS Records > Add a new domain/IP combination
- Domain: “ns1.ttgb.us” IP Address : “10.0.0.8” and select Add
- Domain: “ns2.ttgb.us” IP Address : “10.0.0.7” and select Add
Next, I want to make sure that my two servers stay in sync. Since PIHole doesn’t support this directly, I’m going to use Gravity Sync, a tool specifically designed to create primary/secondary relationships in PIHole.
https://github.com/vmstan/gravity-sync
To kick off this installation, first I’m going to make a backup on NS1, my primary server.
From the PIHole Web Interface which I have logged into as admin:
Settings > Teleporter > Backup
Once the backup is done, I can move back to the command shell.
curl -sSL https://gravity.vmstan.com | bashThe installation script asks me for the IP address, username and password for the secondary server.
Having provided this, the script completes automatically.
I then completed this on NS2.
Back to NS1, I ran the command to do a test sync.
gravity-sync pushAs a check, I went to NS2 and verified that the Local DNS records I added are there, and they are.
Just to check, I also ran the check from the command line on NS1.
gravity-sync compareSince it came back with no errors, I decided to move on.
Last, I want to configure this to happen automatically.
gravity-sync autoThis creates a semi-randomized time for replication to occur, which I’m fine with.
Just a note that in reviewing the statistics for the PIHole server, I noted that there were zero cache insertions meaning that the local cache wasn’t being used.
This caused every request to hit the unbound service on the PIHole.
This behavior can be checked in Settings > System > DNS cache insertions.
If this is a low number (things not being cached), or the DHS cache evictions (things getting kicked out of cache before they should) is high, then you may have an FTL problem.
In my case, a quick reboot resolved the issue.
And all done!
So what have we accomplished so far?
1. Two Ubuntu 22.04 LTS Virtual Machines running PIHole 5.10
2. Configured PIHole to be recursive DNS providers
3. Configured PHole to replicate from primary to secondary servers automatically
Ansible Server Installation
If you’re not familiar with Ansible, it is a very lightweight tool for administering servers. Since many of the labs will require this type of service, it is best to start early getting it set up.
I’ll be following the Ansible documentation on their web page here.
https://docs.ansible.com/ansible/latest/installation_guide/intro_installation.html
First up is to create a lightweight Ubuntu 22.04 LTS server on my S4 VMware ESXi host.
Since Ansible is so lightweight, I really don’t need much here.
My default configuration is a 2 core, 4 gb ram, 40gb storage image with minimal settings on an otherwise default Ubuntu 22.04 server installation.
Before I get started, there are some basic upkeep tasks that I want to do.
This is primarily because I did a minimum install, but there are no bad practices here.
sudo apt update && sudo apt upgrade -y
sudo apt install nano net-tools
The second task here is creating a DHCP Reservation on the firewall giving this a reserved IP address of 10.0.0.9. I also added it to the local DNS address list as ‘ansible.ttgb.us’ which gives me a repeatable DNS name assigned to a known IP address.
Now that we have a basic server setup, we want to create some ssh keys to be able to log into the servers.
In my case, I’ve created a user called ‘console’, but this could be anything.
From my Ansible server, I’ll create my RSA public/private key pair first.
ssh-keygenThis command is pretty straightforward for most administrators, but if you’re looking for information on how and why this command is important, check out their web page.
Now that the key pair is generated, we’re going to copy it to our PIHole servers above as a test.
ssh-copy-id console@10.0.0.8
ssh-copy-id console@10.0.0.7
This command will ask you for your password and should respond with “Number of key(s) added: 1” both times.
To verify that this is working, you should be able to enter the following command and get a shell on the PIHole server.
ssh console@10.0.0.8
ssh console@10.0.0.7
So through this command, we have now created a public / private key pair on our Ansible server and have copied the public key to our PIHole servers.
Keep in mind that I didn’t advise on setting up a private key password, putting that private key onto a key ring, or sharing that private key with other machines. Those are all larger topics that are worth discussing separately.
Now that we have a basic environment setup, let’s start getting to Ansible.
First, we want to install some dependencies.
sudo apt install software-properties-common
sudo apt-add-repository --yes --update ppa:ansible/ansible
sudo apt install ansible
With those commands complete, you should now be able to validate the installation of Ansible.
ansible --versionHere was my output
console@ansible:~$ ansible --version
ansible [core 2.12.5]
  config file = /etc/ansible/ansible.cfg
  configured module search path = ['/home/console/.ansible/plugins/modules', '/usr/share/ansible/plugins/modules']
  ansible python module location = /usr/lib/python3/dist-packages/ansible
  ansible collection location = /home/console/.ansible/collections:/usr/share/ansible/collections
  executable location = /usr/bin/ansible
  python version = 3.10.4 (main, Apr  2 2022, 09:04:19) [GCC 11.2.0]
  jinja version = 3.0.3
  libyaml = True
Hello World
So to get started with Ansible, first we need to create an inventory file.
I want to place mine in /home/console/inventory and call it hosts, but you’re preferences may be different.
mkdir inventory
nano /home/console/inventory/hosts
In our host file we can create different kinds of lists that we will use in Ansible. For now, I just want a list of my nameservers. You can see the Ansible Inventory File syntax here.
[nameservers]
ns1.ttgb.us
ns2.ttgb.us
And to test this out, we are going to ping the servers via Ansible.
ansible -i ./inventory/hosts nameservers -m pingAnd I got back two successful responses.
console@ansible:~$ ansible -i ./inventory/hosts nameservers -m ping
ns1.ttgb.us | SUCCESS => {
    "ansible_facts": {
        "discovered_interpreter_python": "/usr/bin/python3"
    },
    "changed": false,
    "ping": "pong"
}
ns2.ttgb.us | SUCCESS => {
    "ansible_facts": {
        "discovered_interpreter_python": "/usr/bin/python3"
    },
    "changed": false,
    "ping": "pong"
}
APT UPDATE
Next, we want to create a playbook to call apt and to an update/upgrade.
Let’s create a playbook folder and a new file called ubuntu_upgrade.yml
mkdir /home/console/playbooks
nano /home/console/playbooks/ubuntu_upgrade.yml
For this playbook, we want to install some common utilities and change some settings.
Here is my default playbook. Remember YAML is space sensitive.
- hosts: "*"
  become: yes
  tasks:
    - name: apt
      apt:
        update_cache: yes
        upgrade: 'yes'
For this basic playbook, I just want to run update and upgrade as part of a normal APT command.
But because Ansible has an APT module built-in, there are all kinds of really good options.
Check out their documentation for a better explanation.
Next, to test out our playbook we enter the following ansible-playbook command.
ansible-playbook ./playbooks/ubuntu_upgrade.yml -i ./inventory/hostsAnd we get the following output as the task runs.
console@ansible:~$ ansible-playbook ./playbooks/ubuntu_upgrade.yml -i ./inventory/hosts

PLAY [*] *********************************************************************************

TASK [Gathering Facts] *********************************************************************************
ok: [ns1.ttgb.us]
ok: [ns2.ttgb.us]

TASK [apt] *********************************************************************************
ok: [ns2.ttgb.us]
ok: [ns1.ttgb.us]

PLAY RECAP *********************************************************************************
ns1.ttgb.us                : ok=2    changed=0    unreachable=0    failed=0    skipped=0    rescued=0    ignored=0
ns2.ttgb.us                : ok=2    changed=0    unreachable=0    failed=0    skipped=0    rescued=0    ignored=0
APT INSTALL
To finish this off, let’s install a few standard packages. This is especially helpful as the Ubuntu Minimum Server install misses some key functionality.
So first, we create the new playbook called ubuntu_basic_tools.yml.
- name: install ubuntu basic tools
  hosts: "*"
  tasks:
    - name: install net-tools
      apt:
        name: net-tools
        state: present
        update_cache: true
      become: true
    - name: install nano
      apt:
        name: nano
        state: present
        update_cache: true
      become: true
And we run the playbook by entering the following command.
ansible-playbook ./playbooks/ubuntu_basic_tools.yml -i ./inventory/hostsIf everything was done correctly, we should get something like the following.
console@ansible:~$ ansible-playbook ./playbooks/ubuntu_basic_tools.yml -i ./inventory/hosts

PLAY [install ubuntu basic tools] *********************************************************************************

TASK [Gathering Facts] *********************************************************************************
ok: [ns1.ttgb.us]
ok: [ns2.ttgb.us]

TASK [install net-tools] *********************************************************************************
ok: [ns2.ttgb.us]
ok: [ns1.ttgb.us]

TASK [install nano] *********************************************************************************
ok: [ns2.ttgb.us]
ok: [ns1.ttgb.us]

PLAY RECAP *********************************************************************************
ns1.ttgb.us                : ok=3    changed=0    unreachable=0    failed=0    skipped=0    rescued=0    ignored=0
ns2.ttgb.us                : ok=3    changed=0    unreachable=0    failed=0    skipped=0    rescued=0    ignored=0
Because we just installed these programs earlier in this lab, they don’t get installed here. If they were missing though, it would show up as ‘changed’ in the play recap section.
CHANGE TIMEZONE
Next, I want to set up the timezone using a ubuntu_timezone.yml playbook.
- name: set timezone and configure timesyncd
  hosts: "*"
  become: yes
  tasks:
  - name: set timezone
    shell: timedatectl set-timezone America/New_York

  - name: Make sure timesyncd is stopped
    systemd:
      name: systemd-timesyncd.service
      state: stopped

  - name: Copy over the timesyncd config
    template: src=../templates/timesyncd.conf dest=/etc/systemd/timesyncd.conf

  - name: Make sure timesyncd is started
    systemd:
      name: systemd-timesyncd.service
      state: started
This playbook is using a template file located on the Ansible server. So we need to create a new template folder and place the timesyncd.conf into it. Here is the timesyncd.conf file.
#Default time data for NOVA Labs

[Time]
NTP=10.0.0.1
FallbackNTP=time.cloudflare.com
#RootDistanceMaxSec=5
#PollIntervalMinSec=32
#PollIntervalMaxSec=2048
And running this playbook we get the following output.
console@ansible:~$ ansible-playbook ./playbooks/ubuntu_timezone.yml -i ./inventory/hosts

PLAY [set timezone and configure timesyncd] ********************************************************************************

TASK [Gathering Facts] *********************************************************************************
ok: [ns2.ttgb.us]
ok: [ns1.ttgb.us]

TASK [set timezone] *********************************************************************************
changed: [ns2.ttgb.us]
changed: [ns1.ttgb.us]

TASK [Make sure timesyncd is stopped] *********************************************************************************
ok: [ns1.ttgb.us]
ok: [ns2.ttgb.us]

TASK [Copy over the timesyncd config] *********************************************************************************
ok: [ns1.ttgb.us]
ok: [ns2.ttgb.us]

TASK [Make sure timesyncd is started] *********************************************************************************
changed: [ns1.ttgb.us]
changed: [ns2.ttgb.us]

PLAY RECAP *********************************************************************************
ns1.ttgb.us                : ok=5    changed=2    unreachable=0    failed=0    skipped=0    rescued=0    ignored=0
ns2.ttgb.us                : ok=5    changed=2    unreachable=0    failed=0    skipped=0    rescued=0    ignored=0
And all done!
So what have we accomplished so far?
- Installed an Ansible Utility Server based on Ubuntu 22.04 LTS
- Created an SSH Keypair used to remotely log into our earlier Ubuntu Servers
- Installed Ansible and created playbooks to connect to and run jobs on remote servers
Errata
- As I went back and reviewed the functionality, I recognize that the PIHole functionality is duplicated by the pfSense Firewall which has pfBlocker and inherently has a DNS BlackList function built in.
While I’m not a big fan of the metrics that come from it, it uses the same data source for its list.
This will be something I’ll have to reconsider when I document the firewall.